Table of Contents
- The Essential Supplies
- Preparing the Socket Wire
- Attaching the Lights
- Powering the Lights
- Customizing the Lighting Display
- The Finishing Touches
- FAQ
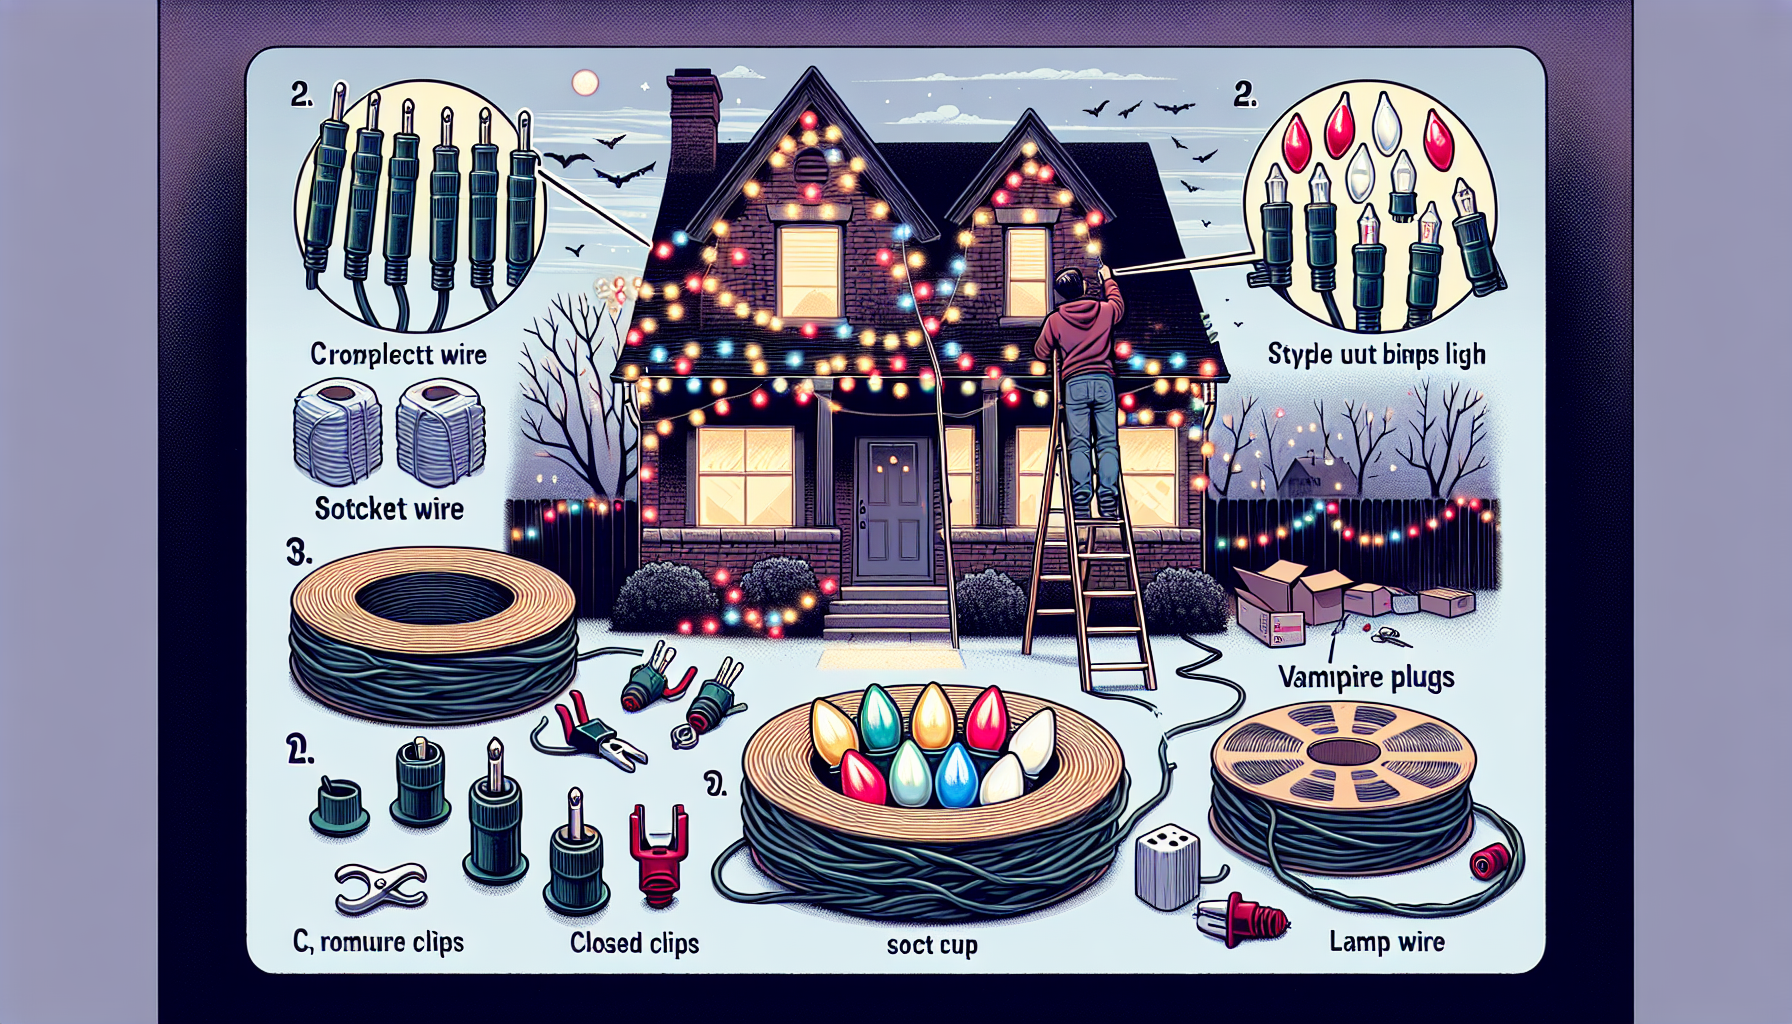
The Essential Supplies
As the holiday season approaches, the excitement of decorating your home with twinkling lights is palpable. However, the task of hanging Christmas lights can seem daunting, especially for those who have never done it before. Fear not! In this comprehensive guide, we’ll walk you through the essential supplies and the step-by-step process to help you transform your home into a winter wonderland.
To get started, you’ll need the following items:
- Socket Wire: This is the backbone of your lighting display. The socket wire typically comes in lengths of 500 or 1,000 feet, with a 12-inch spacing between the sockets.
- LED Bulbs: C9 LED bulbs are a popular choice, offering a wide range of color options, from warm white to cool white, to create a unique and customizable look.
- Clips: Enclosed clips are designed to securely attach the lights to your roof, shingles, and gutters, ensuring a professional-looking installation.
- Male and Female Plugs: Also known as “vampire plugs,” these allow you to custom-cut your lights to the desired length and create custom extension cords.
- Lamp Wire: This versatile wire is used to connect different sections of your lighting display, such as connecting a peak or gutter to another part of the roof.
You can purchase these items individually or opt for a convenient starter pack, which includes all the necessary components for a complete installation.
Preparing the Socket Wire
Before you begin the installation process, it’s helpful to pre-cut a manageable length of socket wire, such as 100 feet. This will make it easier to work with, rather than dealing with the entire spool. Next, you’ll need to attach the male and female plugs to the ends of the wire.
To do this, simply split the wire into two pieces, ensuring that one side is slightly shorter than the other. This small precaution helps prevent the wires from touching and causing any potential arcing or short-circuiting. Then, simply push the male and female plugs into the respective ends of the wire, using a tool or your fingers to ensure a secure connection.
Once the plugs are in place, you can test the power by plugging in the male end and verifying that the bulbs are illuminated. This step allows you to troubleshoot any issues before proceeding with the installation.
Attaching the Lights
Now that you have the power source set up, it’s time to start hanging the lights. Begin by clipping the enclosed clips onto the sockets, ensuring that the clips can swivel 360 degrees. This versatility allows you to easily adjust the direction of the bulbs as you move from gutters to peaks or other areas of your roof.
When it comes to the bulb pattern, you have the freedom to get creative. For a unique look, you can alternate between warm white and cool white bulbs, creating a striking silver and gold effect. Remember to keep track of your pattern as you work to maintain a cohesive and visually appealing display.
Powering the Lights
To power your lighting display, you’ll need to create a custom extension cord using the lamp wire. Start by determining the location of your power source, such as an outlet near your door, and measure the distance to where you’ll be installing the lights. Cut the lamp wire to the appropriate length, allowing for a bit of extra slack, and attach the male and female plugs to each end.
It’s important to unplug the power source before making any cuts or connections to the lamp wire. This safety precaution will prevent the risk of electric shock or damage to your tools. Once the extension cord is assembled, you can tuck it neatly under a doormat or behind a downspout to keep it out of the way and prevent tripping hazards.
Customizing the Lighting Display
One of the great advantages of using a customizable lighting system is the ability to tailor the layout to your specific needs. As you work your way along the roof, you may find that the pre-cut length of socket wire is either too long or too short for a particular section. In such cases, you can easily cut the wire to the desired length, using the same technique you employed for the extension cord.
Remember to always unplug the power source before making any cuts or adjustments to the lighting system. This simple precaution will help ensure your safety and prevent any damage to the wiring or your tools.
The Finishing Touches
The final step in the installation process is to ensure that your lighting display looks professional and polished. The use of high-quality clips is crucial in achieving this goal. Inferior clips can cause the lights to sag or even fall off entirely, ruining the overall appearance of your holiday decor.
The swiveling feature of the enclosed clips allows you to easily adjust the direction of the bulbs, ensuring that they are perfectly aligned and creating a seamless, uniform look. This attention to detail can make all the difference in transforming your home into a true winter wonderland.
FAQ
What is the best way to store Christmas lights after the holiday season?
To properly store your Christmas lights, follow these steps:
- Unplug the lights and carefully remove them from your home.
- Gently untangle the strands and coil them neatly, avoiding any sharp bends or kinks.
- Place the coiled strands in a storage container or plastic bag, ensuring that the bulbs are not crushed.
- Label the container with the specific location or pattern of the lights for easy reference next year.
- Store the container in a cool, dry place, such as a closet or attic, to protect the lights from damage.
How can I ensure my Christmas lights last for many years?
To extend the lifespan of your Christmas lights, consider the following tips:
- Use high-quality, LED bulbs, which are more energy-efficient and durable than traditional incandescent bulbs.
- Carefully remove and store the lights after each holiday season, following the steps outlined in the previous question.
- Inspect the lights for any damage, such as frayed wires or broken sockets, before reinstalling them each year.
- Avoid exposing the lights to harsh weather conditions, such as heavy rain or snow, which can cause damage over time.
- Consider investing in a professional-grade lighting system, which is designed to withstand the elements and provide years of reliable performance.
How can I troubleshoot issues with my Christmas lights?
If you encounter any problems with your Christmas lights, try the following troubleshooting steps:
- Check the power source: Ensure that the lights are properly plugged in and that the outlet is functioning correctly.
- Inspect the wiring: Look for any signs of damage, such as frayed or broken wires, and replace any faulty components.
- Test individual bulbs: Use a multimeter or a voltage tester to check if each bulb is receiving power and functioning properly.
- Check for loose connections: Ensure that all the plugs and sockets are securely connected, and tighten any loose fittings.
- Consider replacing the entire strand: If the issues persist, it may be more cost-effective to replace the entire strand of lights rather than trying to repair individual components.
By following these steps, you can quickly identify and resolve any problems with your Christmas lights, ensuring a seamless and enjoyable holiday display.
In conclusion, hanging Christmas lights may seem like a daunting task, but with the right supplies and a step-by-step approach, you can transform your home into a winter wonderland. Remember to prioritize safety, creativity, and attention to detail, and your holiday lighting display will be the envy of the neighborhood.