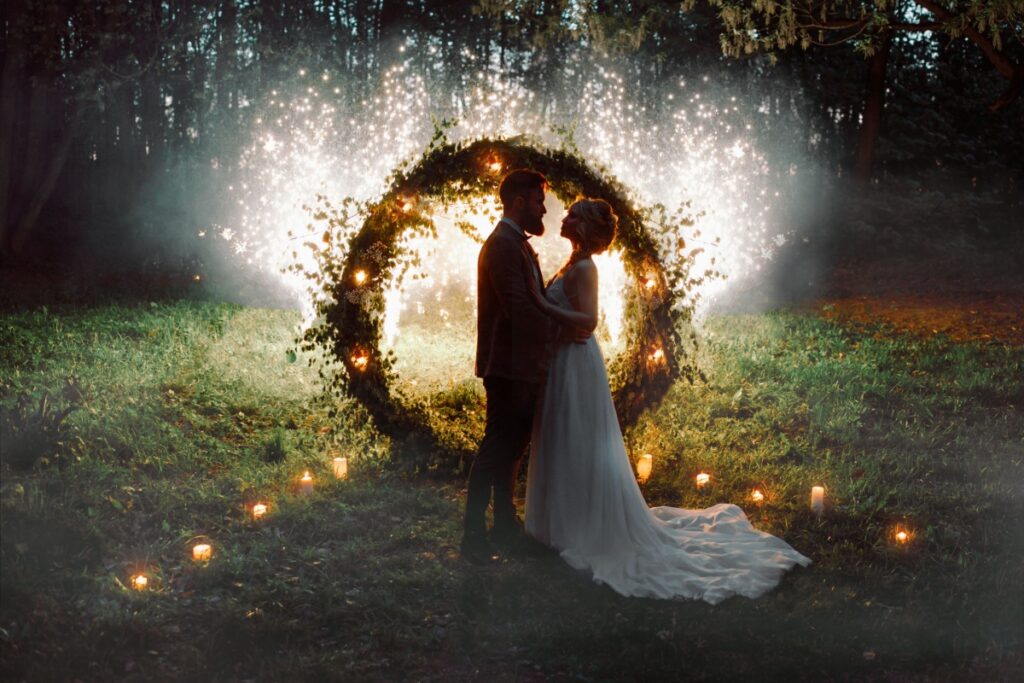
A wedding is one of those once-in-a-lifetime occasions. Planning yours for the fall? You have so many incredible choices ahead. You could get married in early September, when the air still has that little bit of summer warmth. Or maybe you’re dreaming of an October or November date, when things start feeling crisp and cozy, hinting at winter. Fall’s versatility is what makes it so amazing. It opens up a world of unique wedding themes. And it sets the stage for something incredibly important: your wedding lighting.
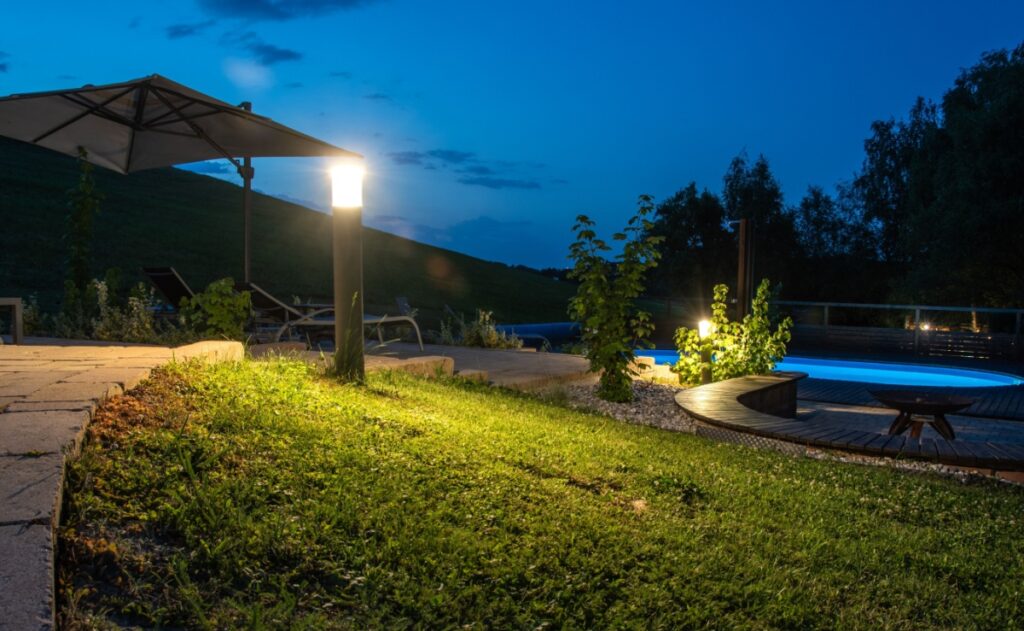
So, you’re thinking about adding outdoor lighting. Smart move! Plants bring life to your home’s exterior like nothing else can. They add color, texture, and natural charm that makes your property feel welcoming and alive. But outdoor lighting takes those beautiful plants and makes them absolutely stunning after dark. Just take a second to imagine your favorite tree glowing softly against the night sky or your garden becoming a magical landscape when the sun goes down. That’s what happens when you combine the right plants with the right lighting. Your yard doesn’t have to disappear when darkness falls. Instead, it can become something even more beautiful than during the day.
Podcasts have exploded in popularity over the past few years. They’ve become a fantastic way to fill your mornings, evenings, or lunch breaks with something that actually stimulates your mind instead of just numbing it. If you’re running a podcast or looking to start one, you probably know how important having the right equipment is for production quality.
Winter weddings have a special kind of magic. When snowflakes sparkle, and crisp air fills your lungs, you’ll discover a romantic atmosphere that summer simply can’t match. The early sunsets and longer nights create endless possibilities for transforming your venue into a cozy, enchanting space. Embrace the warm glow of lights reflecting off snow-covered grounds, creating that perfect backdrop for your love story.
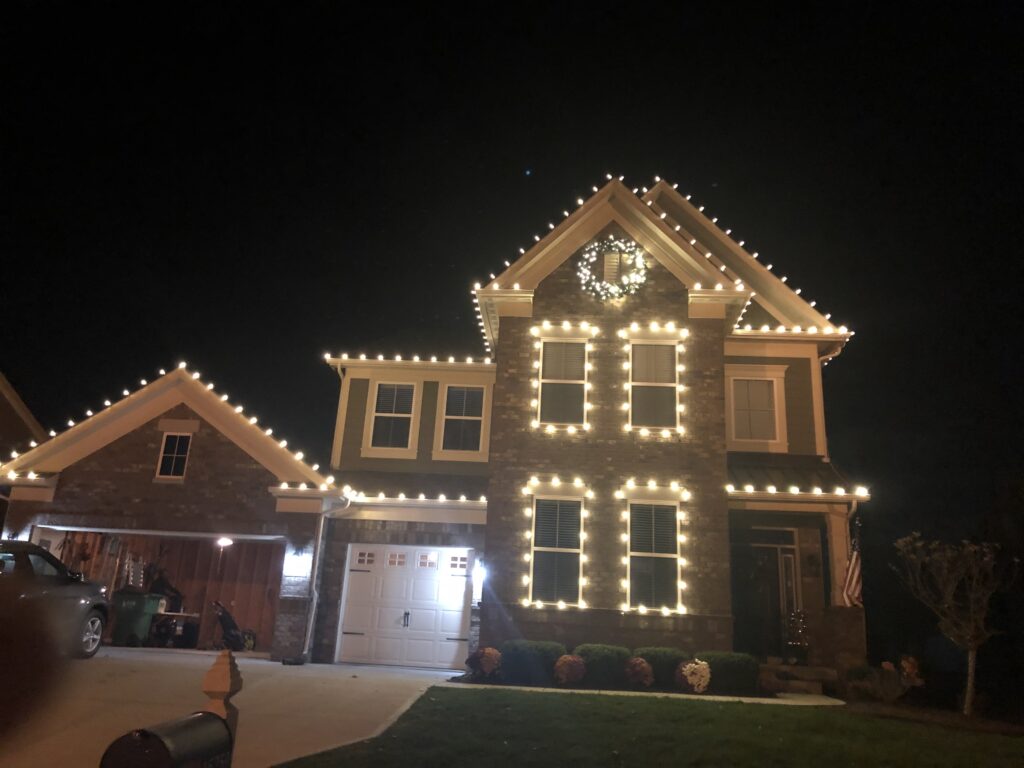
You’re up on a ladder, trying to hang Christmas lights along your roofline. You’ve got a tangled mess of wires, a handful of clips that just won’t stay put, and a growing sense of frustration. Sound familiar? We’ve all been there. The thing is, your problem isn’t your effort or even the lights you’re installing. It’s that you’re not using the right tools to help you out.
You step into a venue, and the atmosphere hits you instantly. Soft beams of light dance across the room, creating a warm glow that makes you feel right at home. As the music starts, the lighting shifts, pulsing with the beat and transforming the space into an electrifying environment. Your heart races as colors swirl and flicker, perfectly in sync with the tunes. This isn’t just a party — it’s an experience that touches your very soul.
Adding lighting to your home’s exterior can greatly enhance its curb appeal and provide a welcoming ambiance. In this blog, we will discuss a simple and permanent light installation method that you can easily do yourself. No need for complicated wiring or professional help.
Materials Needed
Three-foot track
Light clip strips
Pebbles
Installation Steps
The process is straightforward and requires minimal effort. Just follow these steps:
Attach the light clip strips to the track: Start by placing the light clip strips onto the track. These clips will ensure that the lights stay in place for a long time.
Secure the track: Using the clips, attach the track to the desired location. The clips will keep it securely in place.
Attach the lights: Once the track is secured, simply click the lights onto the clips. The lights should fit snugly and stay in place.
Add pebbles: To further secure the lights and add a decorative touch, fill the track with pebbles. These pebbles will keep the lights from sliding and create a visually pleasing effect.
Extend the installation: If you wish to cover a larger area, repeat the above steps by connecting additional tracks together.
By following these steps, you can create a simple yet effective lighting installation for your home.
Below the Gutter Lighting
One popular placement option is installing the lights below the gutter. This setup provides a clean and contemporary look to your home’s exterior. The lights are positioned right against the house, casting a soft glow downwards.
Many homeowners prefer this method for its simplicity and elegant appearance. It adds a touch of sophistication to any home without overwhelming the overall design.
Consider the below-the-gutter lighting option and see if it aligns with your preferences and home’s architectural style.
RGB color changing lights
Frequently Asked Questions
Q: How long will the lights stay in place?
A: The light clip strips are designed to keep the lights securely attached for an extended period. Once properly installed, you can expect the lights to remain in place for a long time, even in various weather conditions.
Q: Can I easily remove the lights if needed?
A: While the installation is intended to be permanent, you can remove the lights if necessary. Simply unclip them from the clips and carefully detach the track from its position.
Q: Can the lights be dimmed or adjusted?
A: The lights used in this installation are typically not dimmable or adjustable. However, you can choose lights with different brightness levels or colors to achieve your desired effect.
4. Do I need any special tools for the installation?
A: No, this installation method does not require any special tools. The tracks and clips are designed to be easily attached and detached without the need for additional equipment.
Conclusion
Creating a simple and permanent light installation for your home is easier than you think. With a three-foot track, light clip strips, and some pebbles, you can transform your outdoor space into a beautifully illuminated area.
Consider the placement below the gutter for a sleek and modern look. This method is both visually appealing and easy to maintain.
So why wait? Start your light installation project today and enjoy the enchanting ambiance it brings to your home.
Installing light bulbs may seem like a simple task, but there are actually multiple ways you can go about it. In this blog, we will explore the easiest way to install light bulbs, regardless of the spacing or orientation. Whether you prefer a straight up and down approach or a quarter turn, we will provide you with the most efficient method.
The Importance of Efficiency
Time is valuable, especially when it comes to tasks that can be time-consuming like installing light bulbs. Traditionally, the process of installing light bulbs can take up a significant amount of time, especially if you are using the no wrap straps method. However, by adopting the easiest way to install light bulbs, you can save precious time and increase your productivity.
Quarter Turn or Straight Up and Down?
When it comes to installing light bulbs, there are two main approaches – the quarter turn method and the straight up and down method. The choice between these two methods ultimately depends on your personal preference and the specific situation. If you opt for the quarter turn method, you simply need to twist the light bulb a quarter of a turn to secure it in place. This method is quick and easy, ensuring that the bulb is securely installed without any fuss. Alternatively, you can choose the straight up and down method, where you insert the light bulb straight into the socket without any twisting motion. This method is equally effective and provides a secure fit for the bulb. The straight up and down method may be preferred by those who find twisting motions difficult or prefer a simpler approach.
Consider the Spacing
Regardless of whether you choose the quarter turn or straight up and down method, it is important to consider the spacing between the light bulbs. The spacing will determine whether you need to adjust your installation technique. If the spacing between the light bulbs is wide, you have more flexibility in your approach. You can choose to install the bulbs straight up and down, without the need for any twisting motion. This can be particularly beneficial if you are working in a large area with multiple light fixtures. On the other hand, if the spacing between the light bulbs is narrow, a quarter turn method may be more suitable. This allows you to easily maneuver the light bulb into place without any obstructions.
Installation Efficiency
The easiest way to install light bulbs is ultimately determined by the efficiency it brings to the process. By adopting the most efficient method, you can save valuable time and increase your productivity. For example, if you are installing multiple light bulbs in a large area, the quarter turn method may be the most efficient. This method allows you to quickly and easily secure each bulb in place without wasting unnecessary time. However, if you are installing a single light bulb or working in a space with widely spaced fixtures, the straight up and down method may be just as efficient. This method eliminates the need for any twisting motion, simplifying the installation process.
FAQ
Q: Does it matter if I twist the light bulb or go straight up and down?
A: No, it doesn’t matter. Whether you choose to twist the light bulb a quarter turn or go straight up and down, the end result is the same – a securely installed bulb.
Q: Which method is the easiest?
A: The easiest method depends on your personal preference and the spacing between the light bulbs. If the spacing is narrow, a quarter turn method may be more suitable. However, if the spacing is wide or you prefer a simpler approach, the straight up and down method is equally effective.
Q: How can I increase my installation efficiency?
A: To increase installation efficiency, consider the number of light bulbs you need to install and the spacing between them. If you are working in a large area with multiple fixtures, the quarter turn method may be the most efficient. However, if you are working with widely spaced fixtures or installing a single bulb, the straight up and down method can be just as efficient.
Conclusion
When it comes to installing light bulbs, efficiency is key. By choosing the easiest method for your specific situation, you can save valuable time and increase your productivity. Whether you prefer a quarter turn or a straight up and down approach, the end result is a securely installed light bulb. So next time you find yourself faced with the task of installing light bulbs, consider the spacing, choose the most efficient method, and enjoy the benefits of a streamlined process.
It’s Christmas time, and what better way to get into the festive spirit than by decorating your house with beautiful Christmas lights? In this blog, we will provide you with a step-by-step guide on how to hang Christmas lights around windows. Whether you have brick arches or traditional windows, we have got you covered!
Hanging Christmas Lights on Brick Arches or Windows
If you have brick arches or windows, the process of hanging Christmas lights may seem a bit challenging. However, with the right tools and techniques, it can be a breeze. Here’s how you can do it:
Step 1: Gather your materials
Ryobi cordless drill
Christmas lights
Glue
Step 2: Preparing the lights
Before hanging the lights, you need to prepare them. Take each socket and put a small dab of glue on it, making sure to avoid getting any glue on the springs. Hold the socket in place for about 30 seconds to allow the glue to dry. Repeat this process for all the sockets.
Step 3: Attaching the lights to the brick
Starting from one corner of the window, attach the sockets to the brick by pressing them firmly. Repeat this process all the way around the window, ensuring that the lights are evenly spaced. Be careful when attaching the lights to doors, as they can easily be knocked off by people walking around.
Step 4: Finishing up
After attaching all the lights, remove the ends that won’t stick to the brick by breaking them off. This will give your lights a clean and polished look. Finally, plug in the lights and enjoy the beautiful display!
Getting Power to the Lights
Now that you have successfully hung your Christmas lights, let’s talk about how to get power to them. Here’s what you need to do:
Step 1: Dropping the power cord
Start by dropping the power cord down to the first window. Ensure that it is long enough to reach the nearest power source.
Step 2: Adding the inline plug
Once the power cord is in place, add an inline plug to it. This plug will allow you to connect the lights and power them up.
Step 3: Connecting the lights
With the inline plug in place, connect the lights to it. Make sure the connection is secure to avoid any power disruptions.
FAQs
Q: Can I hang Christmas lights on windows without using glue?
A: While using glue provides a secure attachment, you can also use adhesive hooks specifically designed for hanging lights on windows. These hooks can be easily removed without damaging the window.
Q: How do I ensure the lights are evenly spaced?
A: To ensure the lights are evenly spaced, measure the perimeter of the window and divide it by the number of lights you have. This will give you the approximate spacing between each socket.
Q: Can I leave the Christmas lights on overnight?
A: It is generally recommended to turn off Christmas lights when you go to bed or leave the house. This not only saves energy but also reduces the risk of fire hazards.
Conclusion
Decorating your house with Christmas lights is a wonderful way to spread holiday cheer. By following the steps outlined in this blog, you can easily hang Christmas lights around your windows, even if you have brick arches. Remember to take the necessary precautions and enjoy the festive ambiance created by your beautifully lit windows!
Are you looking to add some festive cheer to your home this holiday season? Installing Christmas lights can be a fun and rewarding project. In this blog, we will share expert tips and advice on how to install Christmas lights like a professional. Whether you are a homeowner or a landscaping company, these tips will help you create a beautiful and well-lit display.
Meet the Expert
Donovan Questionberry is a seasoned professional in the field of Christmas light installation. In this video, he is joined by Joaquin, who owns a landscaping company and is looking to expand his services to include Christmas light installation. Let’s dive into their conversation and learn from their expertise.
Preparing for the Job
Before you begin installing Christmas lights, it is important to have all the necessary tools and equipment. Donovan suggests storing the lights in trash cans to keep them organized. Lay them out along the house to get a sense of how much you will need. If you have a steep roof pitch, you may need to use a specialized tool like a goat or a bucket truck to reach the higher areas.
Getting Started
For beginners like Joaquin, the first step is to cut one end of the light strand to make it easier to work with. It’s a simple but important tip that can save you time and frustration. When stringing the lights, make sure to avoid overlapping the strings to prevent tangling. If you need to hand lights to someone working on the roof, a pole can be a helpful tool.
Pro Tips for Smooth Installation
TIP 1: Leave Enough Room
When working with a pole or any extendable tool, make sure to leave enough room at the top. This will allow you to grip the next section and loosen the grip easily. If the pole is too tight, it may become difficult to adjust or collapse.
TIP 2: Prevent Tangled Mess
When wrapping up the lights after the holiday season, avoid rolling them into a spool. This will only create a tangled mess when you try to remove them. Instead, loosely coil the lights and secure them in a way that allows for easy unraveling.
Using a Bucket Truck
In certain situations, like when dealing with high peaks, using a bucket truck can be incredibly helpful. Donovan demonstrates how the bucket truck can be used to reach difficult spots on the roof. Alternatively, a ladder or a goat can also be used depending on the specific requirements of the job.
Frequently Asked Questions
Q: Can I install Christmas lights on my own? A: Yes, with the right tools and guidance, you can install Christmas lights on your own. Just make sure to follow safety guidelines and take necessary precautions.
Q: How do I prevent the lights from tangling? A: Avoid overlapping the light strings and make sure to coil them loosely when storing. This will prevent them from getting tangled and save you time during installation and removal.
Q: What if I have a steep roof pitch? A: If you have a steep roof pitch, consider using specialized tools like a goat or a bucket truck to safely reach the higher areas. Alternatively, a ladder can also be used, but make sure to take proper safety measures.
Conclusion
Installing Christmas lights can be a fun and creative way to decorate your home during the holiday season. With the expert tips shared in this blog, you are well-equipped to tackle the job like a professional. Remember to plan ahead, use the right tools, and follow safety guidelines for a successful and beautiful display. Happy decorating!